

How To Keep Camera Still On Tripod
Some of the nigh common advice in photography, peculiarly for landscape and architectural piece of work, is to employ a tripod. But the story doesn't end there. Even if you have a top-of-the-line tripod and head, bad tripod technique can result in some seriously blurry shots.
This is especially something you'll notice when y'all shoot in windy atmospheric condition and use longer lenses. Still, by following the steps beneath (some of which are obvious, others of which are more than obscure) you lot tin get abrupt photos no matter the situation.
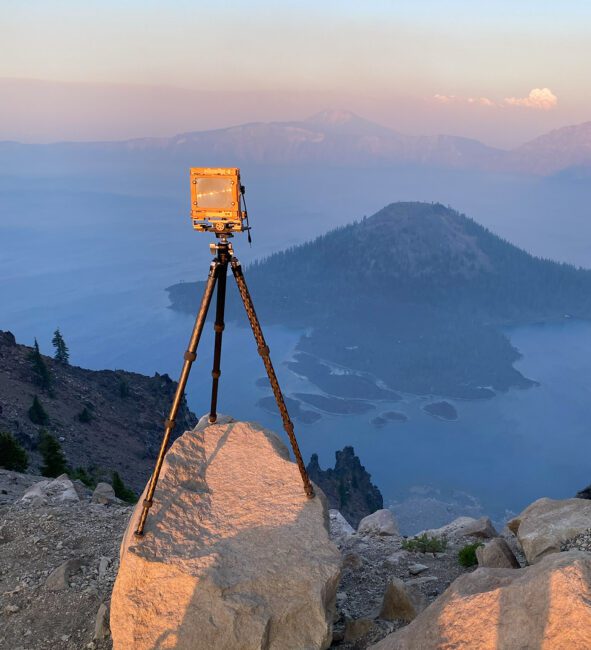
Personally, I realized how much room for improvement there was in my tripod technique once I started shooting big-format moving picture and getting mild blur from photographic camera shake in a lot of photos. The typical blueprint of a field 4×5 or eight×10 photographic camera is less stable than that of a digital photographic camera, and they're likewise larger and heavier, and then at that place's less room for mistake in your tripod technique. A few of the afterwards tips in this article stem from what I've learned by shooting with that pretty exacting equipment.
1. Start on Stable Basis
Pace one is to think of the ground every bit an extension of your tripod. In that location's a big divergence betwixt the seashore, a stable rock, or spongy marsh. The less the basis moves, the less your tripod will motility, likewise.
You're not ever going to exist able to avoid shooting from unstable ground. If you're taking pictures from a depression angle as a wave rolls into shore, your tripod might be partway underwater and unavoidably unstable. But even then, there'due south often going to exist a sturdier vantage point if you look for information technology. Rather than putting the tripod on a patch of shifting sand, is in that location a nearby rock yous can use instead?

I've constitute that at that place's normally some variation in how unstable the ground is when it's unstable. In a marsh, maybe there's a rock or a clump of grass that works better than spongy moss. Or, if you're shooting well-nigh a river, perhaps you tin can shuffle around a rock so that your tripod is out of the water rather than in information technology.
If at that place's actually nix yous can do, that brings me to the adjacent point…
2. Use the Right Feet
When the ground is unstable, dig into it. Fifty-fifty in the worst cases, similar a sandy embankment with waves buffeting your tripod, the ground is likely to be much more stable merely a few inches beneath the surface.
The easiest way to dig into the ground is to swap your usual tripod feet for spikes. With tripod spikes, you can push button the tripod down, and get the earth itself to "agree onto" the tripod with a stiff grip. But even if you don't have tripod spikes, you tin can simply push the tripod down firmly and get some of the same benefits.
Of course, make sure you're not doing any of this if you're shooting somewhere with sensitive basis. I've photographed some slot canyons with scrape marks most basis level that look suspiciously similar the marks a spiked tripod would go out. The better time to use them is when you lot're photographing something similar a seashore or when your tripod is partway underwater in a stream.
3. Become Depression
The lower your tripod is, the better it dampens vibration. If you're shooting from a tripod and struggling to get sharp photos because of external factors (like the wind or water jostling your tripod), yous should e'er enquire yourself if it's possible to lower the platform. Information technology may audio obvious, just it's astonishing how many photographers I run into always set their tripods up at maximum elevation. If you lot practice that in very windy weather, there'south no way effectually it; you lot're losing sharpness.
This is doubly truthful if y'all're using a heart column. When your eye column is raised, it makes your system very prone to transmitting vibrations. It's basically like clamping a monopod on top of your tripod, which is about as stable every bit it sounds. I recommend extending information technology but equally a final resort. (Some photographers go so far as to remove the center column from their tripod entirely if that's an pick on their model, since it saves weight and gains a pocket-sized amount of stability. I'm not confronting that.)
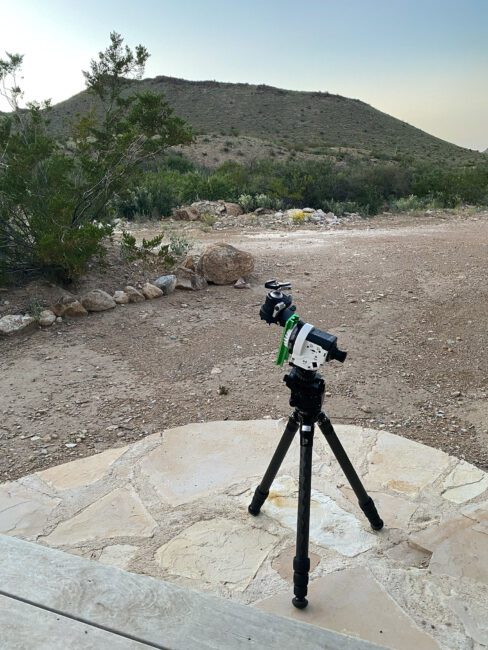
Recently, I was setting up a kit with focal lengths upward to 900mm (some 600mm too) for deep-heaven astrophotography. It's a setup that is especially prone to photographic camera milkshake, and then I decided to collapse all the leg sections of the tripod to minimize vibrations, as you can see below. It worked and led to sharp images every time, letting me photo afar galaxies with pinpoint sharpness. That's the power of lowering your tripod!

4. Extend the Thinnest Sections Terminal
Along similar lines, if y'all do need to shoot above footing level, avert extending the thinnest tripod leg sections until you take no selection. Thinner leg sections but don't dampen vibration likewise. So, if possible, start past extending the thicker sections at the summit of the tripod and work your way downwardly from there. It'due south a bit more awkward ergonomically, but it's worth it for a more stable platform!
The big exception is if you're shooting in weather condition – mud, sand, saltwater, etc. – where you're at risk of grit getting in your tripod joints. In cases like those, you may need to keep the lesser tripod sections extended merely to position the tripod joints higher and avert damaging your equipment. But otherwise, extending the thinnest tripod legs final is the way to go.
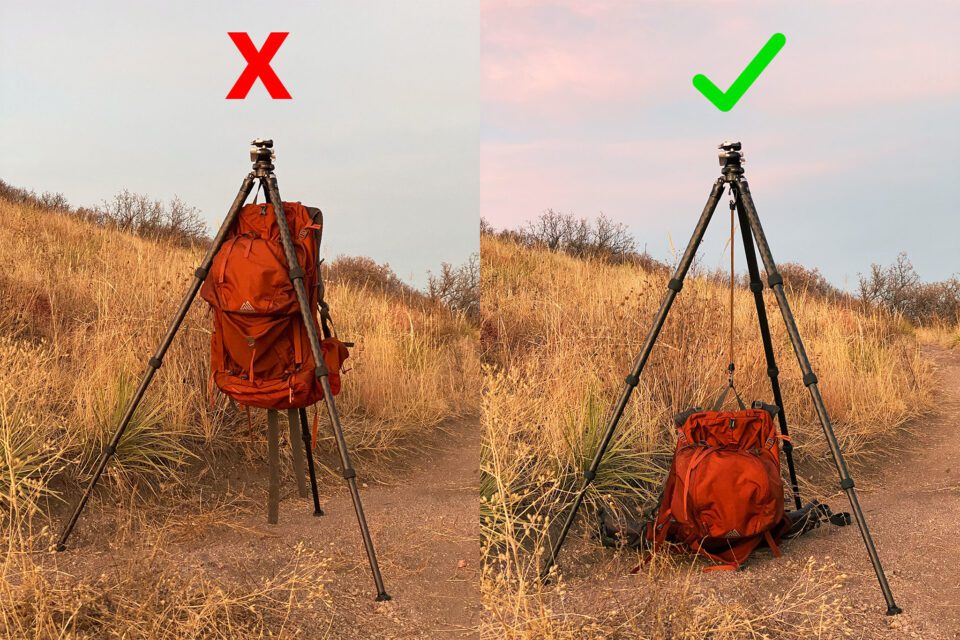
5. Don't Hang Your Bag the Wrong Manner
Information technology seems to be very popular advice to hang a backpack from your tripod in windy atmospheric condition to stabilize the platform. But I find that this tin can cause the backpack to swing effectually and actually brand the setup less stable than before.
The one thing it does do is lower the tripod's center of gravity and make information technology less probable that everything tips over (which has happened to me and many other photographers I know at to the lowest degree one time). Simply there'due south a better solution to that problem.
Instead of hanging the backpack directly from the tripod, put the backpack on the footing. Then, set a rope or bungee string between the two so that the tripod is pulled downwards. This way, information technology'due south much more than like having a "4th tripod leg" because your bag is in contact with the footing rather than swinging in the air. You'll benefit from the lower center of gravity without the issue of your bag swinging in the wind.
6. Tighten Everything Down
The stability of a tripod tin alter a lot based on how firmly its components are tightened down.
I've been guilty of this 1 before. Sometimes, I've left the panning base of my tripod head a scrap loose while I take photos, especially if I'k shooting multi-image panoramas (and other times when I just forget about it). Perhaps you've done something similar. If y'all do this on a at-home day with a broad-bending lens, you may never discover a problem with sharpness. Just the moment you start using a telephoto lens in gusts of wind, the divergence will exist apparent.
Besides, in catchy conditions, I don't recommend merely tightening things down the minimum amount. Most locking knobs can be forced a footling, and while I don't recommend going too far (which can impairment your tripod over time), I exercise suggest giving things a solid plough. Even on my highest-end tripod, the difference is articulate in one case I kickoff using longer, heavier lenses. If the tripod is only locked down to the minimum, information technology has some noticeable "give." My tripod heads are the aforementioned way.
Once more, don't strength it, or you lot could break the tripod. Only especially when using longer lenses in windy conditions, I suggest give the locking knobs an extra flake of oomph.
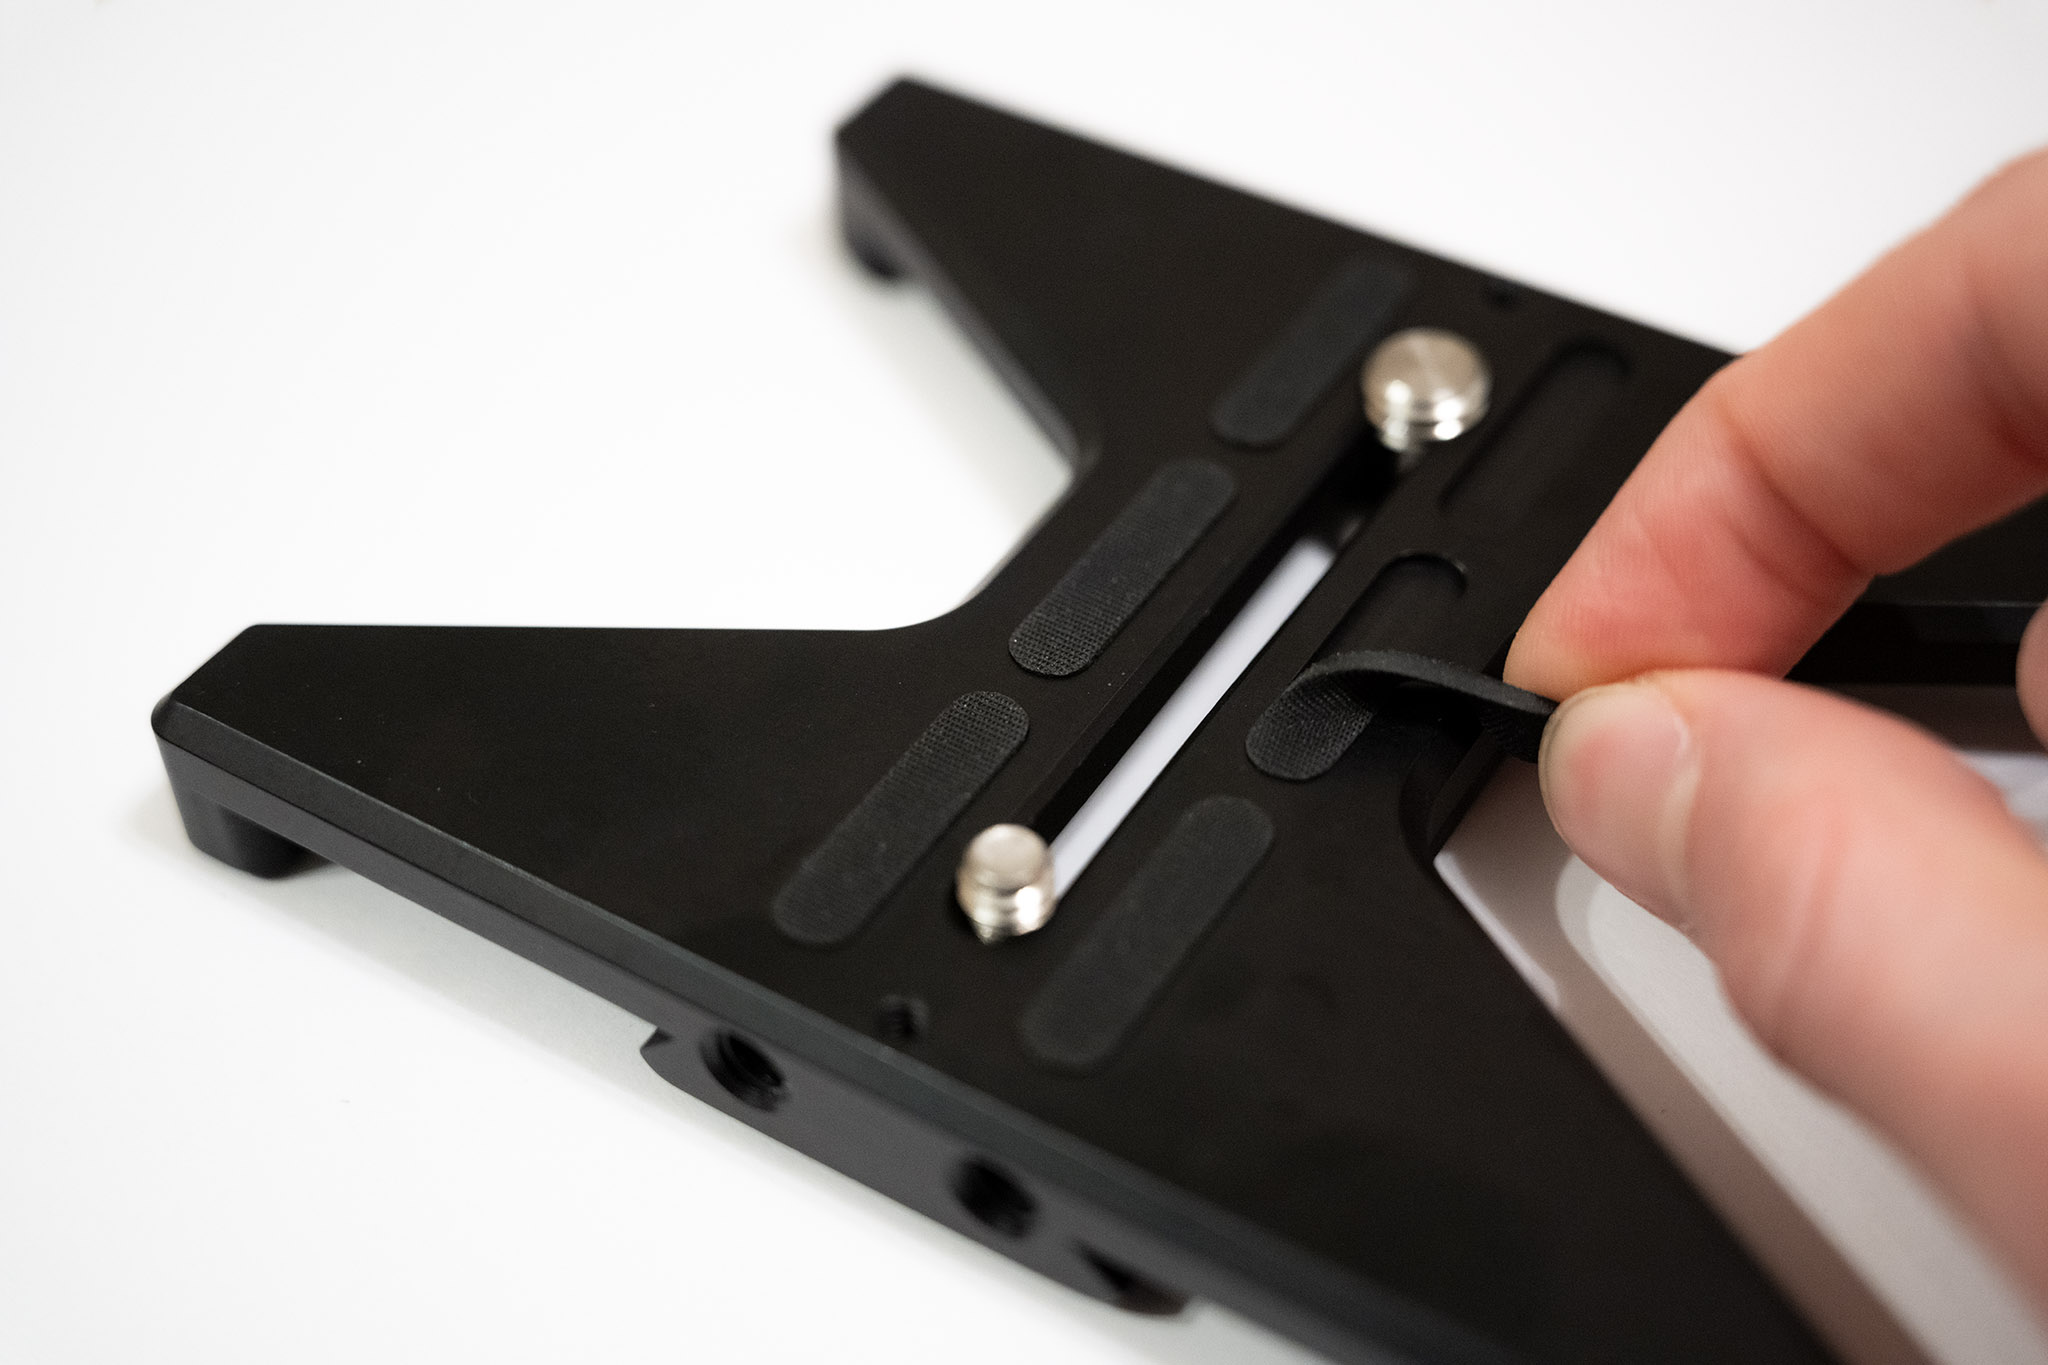
7. Remove the Rubber Spacers
Would y'all put a sponge between your tripod caput and the peak of the tripod? No? Then why would y'all desire rubber or cork spacers in any part of your tripod organization?
It's very mutual for the plate that screws into your camera to have rubber grip record or spacers. And while some of the thinner ones might non be causing much of a trouble, I've seen some that are practically mousepads! These spacers are adding instability to the system in substitution for some meaningless "grip" between the tripod plate and camera – which you lot already have plenty of once the plate is screwed in.
I've started removing these spacers from my tripod plates entirely. About of them are only attached with a calorie-free adhesive and are very piece of cake to have off. One time you practice and so, the improvement may seem subtle at first, only you'll grow to appreciate it in bad conditions. Personally, the 10+ pound big format cameras I've been using recently wobbled like a inexpensive funfair ride until I removed these rubber spacers (equally well as making a few other improvements from this article).
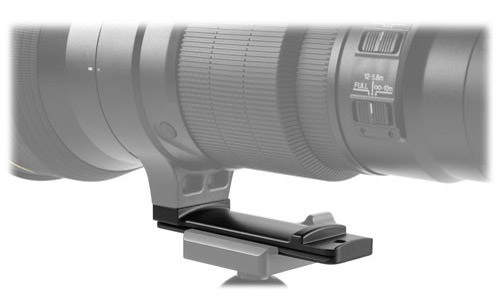
8. Rest Your Photographic camera
Most camera setups are front end-heavy when the lens is attached, specially if you're shooting with a long telephoto. This can make the tripod setup less stable. So, as much as possible, try to position your camera and lens so their centre of gravity is positioned about the center of the tripod.
Sometimes, this means using your lens'southward tripod collar if it has ane. Other times, you can shift the tripod plate or tripod head itself to get a like event. Some deep-heaven astrophotographers even use counterweights when working with heavy lens! (Though this is mainly to proceed the tracking motor from wearing out too speedily.)
In any case, the better your camera is counterbalanced, the less wobbly it will be, and the sharper photos you lot'll accept.
9. Don't Touch the Tripod
My terminal tip for getting a more stable tripod is to avoid calculation any sources of vibration yourself! The obvious example is to avoid grabbing the tripod while yous're taking photos, since the natural movement of your easily will bear witness upwards in photos. Fifty-fifty in very windy conditions, I recommend simply lowering the tripod and hanging a bag (the correct manner) instead of holding onto the tripod for stability.
But "don't touch the tripod" also extends to some sources of vibrations you may not be thinking nigh. If you lot're on semi-stable basis, are you standing far enough away from the tripod? Or could yous exist adding instability to the platform every time you lot accept a step or shift your weight?
Go along in mind, too, that pressing the camera's shutter button can add only as much blur as a gust of current of air. Luckily, it'due south like shooting fish in a barrel to fix the issue by using a timer delay or an external shutter release to trigger the shot. You may still need to fence with shutter shock (solvable with electronic or electronic-front-curtain shutter) but at to the lowest degree take eliminated one of the large sources of blur.
Conclusion
Skilful tripod discipline is generally about remembering to do a handful of things that are all pretty intuitive on their own. But the moment yous start slipping – maybe you've extended your center column, forgotten to tighten the tripod head's panning base of operations, and ready on slightly unstable footing – your photos will be blurry. It doesn't affair if you have the best tripod on the planet; using it badly will go yous results like a $5 monopod.
Hopefully this article helped steer you lot in the right direction. Side by side time that y'all're shooting in windy conditions with a telephoto lens, residuum assured that information technology's possible to go tack-sharp photos, up close so long as your tripod discipline is good.
If you take any questions about these tips or whatsoever of your own to add, let me know in the comments section below!

How To Keep Camera Still On Tripod,
Source: https://photographylife.com/how-to-make-tripod-more-stable
Posted by: willsonmagur1975.blogspot.com
0 Response to "How To Keep Camera Still On Tripod"
Post a Comment